Happy Bakers Box

And Suddenly it’s Thursday!

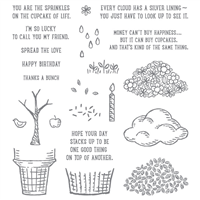
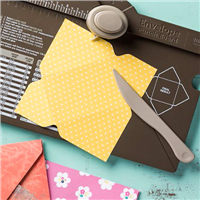
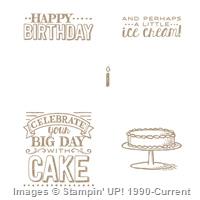
For today’s project I am combining the stamp set of the week That Thing You Did with a die set that I purchased recently and that’s the bakers box thinlet dies. I absolutely love this die set as soon as I seen it I new I had to have it. It make producing baker boxes so much easier no faffing about cutting and scoring and it comes with extra dies for embellishing like a cutie little heart or the word yum.

And here is the finished box.

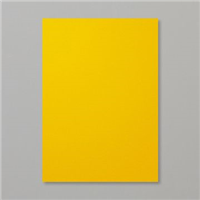
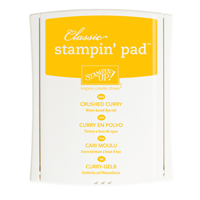
Here I have used Crushed Curry card stock for the base of the box and before sticking it together I used the dashed line stamp from you guest it That Thing You Did stamp set but I wasn’t happy with that on its own so I used one die to cut a window in the box and then covered this with a little bit of window sheet then stuck the box tabs together. Pinched it at the top and tide the box closed with some Crushed Curry Striped Grosgrain Ribbon. For the front I used the happy birthday stamp and the swish from the stamp set of the week stamped in Lost Lagoon and mounted them on using dimentinals.

It’s a cute simple box but I feel it is a little lacking in some way so perhaps next time I will use some designer series paper to liven it up, till then thanks for stopping by.

Birthday Card Tuesday

Yay its Tuesday that means tonight I get to play baseball!

Have a very fun card for you this week.

I just love our new in colors!

To start with the base is the usual half of A4. To make the floral background I cut a piece of whisper white to be a 1/4 shorter than the base on all sides. I then picked out a stamp from the Petite Petals and stamped that repeatedly in Watermelon Wonder, Delightful Dijon and Mint Macron. For the center piece I cut a strip of Tip Top Taupe envelope paper and Watermelon Wonder card stock to make small banners and then glued a piece of the Mint Macaron 1″ Dotted Lace Trim on top. The Butterfly is cut from Crushed Curry using one of the butterflies from the Butterfly basics thinlits die. The happy birthday sentiment is from the butterfly basics stamp set and is inked in Mint Macaron.

Thanks for stopping by, come back again soon.

Freshly Made Tree

These days pass in such quick succession it’s frightening but that’s also what makes those little moments special.

Finally used my tree builder punch!

Now I have had this punch and the matching stamp set sprinkles of Life since the pre-order began in may but I just haven’t had chance to use it and I was trying to come up with a card design that wasn’t CASED from somewhere. Theres nothing wrong with caseing in fact I do a lot of it but I really like this stamp set and wanted to make something that I came up with myself the first time I used it. I know I am using a Freshly Made Sketches for this card even though I say I want it to be original but they layout actually helps with that as they are different each week and the Sprinkles of life and punch have only been out a week so the competition would have been flooded with cards that use them.

So without further ado here is this weeks sketch.

And here is mine.

I found this weeks sketch rather challenging to be honest and struggled to come up with some that I 100% love. I think the reason I was finding it difficult was because of the circle as at the moment the largest circle I have is 2″ (really need to get those circle dies for my big shot). the whole idea behind the card is that it was meant to represent a hot summers day (don’t seem to get a lot of them here in the uk). I love the centerpiece I just think it’s a little small on this size card or I should of set it with a layer of white behind. I do love the way the sky and grass turned out, this was made using a piece of whisper white and two of the washi tapes from the Cherry on Top set.

Next time I think I will make a whole orchard of trees of a muffin or even an ice cream ooh I just love the versatility of the Sprinkles of Life stamp set.

Thanks for stopping by, come back again soon.

Mini Tote Bags

Its Friday!

That means its time for this weeks 3d project.

For this weeks project I decided to have a go at making those cute tote bags everyone has been making but because I am so frugal with my supplies I wanted to get the most out of my paper so I made some mini tote bags with the help of the lovely Bibi Cameron and her wonderful video.

I love her video the process is so simple and easy to understand and it only uses one sheet of DSP for each bag, Embellishments require more of course but to make the initial shape you will just need a sheet of DSP that is 6 x 6 which is fantastic as that is the exact size of the new paper stacks. You can also make four from one 12 x 12 DSp which is great if you want to make lots for a party favors.

For me I made these lovely three below.

One of them is an impostor!

Yes I know very naughty of me to use a DSP that is no longer available but I had some left over and it was my test one and it turned out so well I posted it with the others. The other two are made from the new Cherry on Top DSP. If you have seen my Tuesday post then you know how much I love this paper stack and why it was the perfect choice for this project. One thing I will suggest is use a strong glue like Fast Fuse or Tombo as I used Snail at the time and they kept popping open.

If you have any suggestions for my next 3D project let me know in the comments below.

Thanks for stopping by, come back again soon.

Thinlits Storage Box

Friday here at last.

By this point in the week hopefully my pre-order from the new catty launching on June 2nd has arrived. As a demonstrator we get a sneak peek of the catty before everyone else and get to order a set selection of products which I will be showcasing in the weeks leading up to the release of the new catty.

For this weeks 3D project I am casing a thinlit storage box from the lovely Sam aka Pootles.

Here are my boxes.

SAMSUNG CSC

SAMSUNG CSC

SAMSUNG CSC

The boxes themselves are made from one sheet of A4 card stock! Amazing right?

So do you want to make one of these lovely boxes? Of course you do!

Now you will need a piece of cardstock in the colour of your choice and you will need to score it on the long side at 4 and 6 inches and on the short side at 1 3/8 & 6 7/8 inches and that its. Ok this part is tricky to explain so I have provided some pictures. So once you have scored and burnished it should look like this.

SAMSUNG CSC

Now that bigger section on the left is going to be the back of the box. Next cut up the two lines on either side of the center of the paper like below.

SAMSUNG CSC

Make sure you notch them slightly. Apply glue I have used fast fuse and sick the tabs to the back part of the box like in the picture.

SAMSUNG CSC

Next apply lots of glue to the front two folded sections and stick them over the back section.

SAMSUNG CSC

Finally sick a piece of dsp measuring 5 1/4 x 3 3/4 inches to the front and tie a ribbon of your choice round the box. If you’re having difficulty understanding the instructions you can watch Sam make them here.

Thanks for stopping by, come back again soon.

Freshly Made Birdy

Its Sunday!

Everyone having a nice weekend? I know I am, went to a relatives birthday party last night, there was some great food and so many people I hadn’t talked to in a while it was nice to catch up. I have such a large family it is hard to keep up sometimes.

As you probably already know Stampin Up released their retiring products list recently and on it where some of my favourite products so as a little send off I was determined to use some of them on my entry to the Freshly Made Sketches challenge.

So here is this weeks sketch.

FMS Final 183-001

And here is mine.

SAMSUNG CSC

I just love the combination of crushed curry, real red and pacific point.

To start I cut a piece of whisper white in half vertically and then folded it in half to form the base. Next I took a scrap piece of crushed curry and stamped it using crushed curry ink and the positively chevron background stamp, which is in fact a retiring stamp. I am actually really sad about this as it was the first background stamp I purchased and I used it in one of my earlier birthday card Tuesday post and it is such a versatile stamp I hope they replace it with something equally as cool.

The little strip of red and white hearts at the bottom is from the stacked with love dsp and i have wrapped a bit of white bakers twine around it. For the tag on the card I have used a 2″ wide strip of pacific point which had been embossed with the honeycomb texture and I then used the scalloped tag topper on one end. I then repetedly wraped some backers twine through the hole.

Now the next stage involved two more retiring products and those would be the hello love hostess stamp set and the word bubbles framlest which I had only purchased last month so I never had a lot of time to do anything with them so I wanted to make them the focal point of the card. The sentiments were stamped in real red and cut out using the word bubble framelets. The bird was stamped in tuxedo black and I had to hand cut around it which was the biggest challenge of all for this card. All of these elements were then mounted using dimensions.

Despite these products retiring I think I will continue to use them even if it is only on non blog related cards.

Thanks for stopping by, come back again soon.

Supply List

Built for Free Using:  My Stampin Blog

Freshly Made Potpourri

Its Sunday!

Boy that came around quick and I honestly have no idea what I did all week other than work.

I have a large order of cards that have to be finished by the end of today and I am really struggling with some of them especially the ones that have to have numbers on them. I find it difficult to get the card to look the way I want when I have to include numbers especially since the number stamps I have are tiny. 😦

Oh well just have to keep plodding forward and right into this weeks Freshly Made Sketch.

And here it is.

And here is mine.

SAMSUNG CSC

I have been wanting to use the petal potpourri stamp set for ages just not sure on what and then I got the occasions 4 you stamp set and it had that thanks a bunch stamp in it and knew it would be perfect with this stamp set.

So to start with I cut a piece of A4 crushed curry cardstock in half lengthways and folded it in half. next I cut some whisper white down to the size of the card front and stamped the flowers in island indigo and on a separate piece i stamped on in blackberry bliss. I then trimmed the front piece to the required size and stuck it down. I also stamped the greeting in blackberry bliss and cut that down to the right size I then mounted that and the flower using dimensionals. I really wanted to put a button in the middle of the flower but I didn’t have any in the right colours.

Really simple card this week, but I really like this weeks sketch so perhaps I will use it again on a future card.

Thanks for stopping by, come back again soon.

Birthday Card Tuesday

Hi and welcome to this weeks birthday card Tuesday post.

Did everyone have a nice weekend? I wish I could say my was relaxing but I have a tendency to stress myself out even when I am trying to relax especially when I found myself behind on writing Sundays blog post. Now I know I don’t have to write them but I still get myself into a tiz if I think I am behind.Silly I know but I want to be consistent and have fun blog posts and projects for everyone to read about, and todays post is no exception but at least I’m writing it in advance.

The card I made was for my mother’s birthday so I couldn’t post it till now as I didn’t want here to see it before her birthday and now it has been and gone so its ok for me to post.

So here it is:

SAMSUNG CSC

SAMSUNG CSC

SAMSUNG CSC

For this weeks card I moved away from the traditional style card and did a file folder card. I have always wanted to make one of these ever since I seen one on Mashel Last blog during sale a bration you can find it here. Unfortunately she doesn’t actually explain how to recreate it but I then discovered this video on youtube that shows you how to make it with an envelope punch board which is fantastic and you can find it here.

I love cute projects like these as they can be so easily adapted for any occasion and are great for holding gift cards and if they want to get more use out of it the recipient can use it to give it to someone else all they have to do is replace the insert.

For those who are regular readers and those that aren don’t forget to come back Friday to see what my new weekly project it.

Thanks for stopping by come back again soon

Birthday Card Tuesday

Hi everyone welcome to this weeks birthday card Tuesday.

Did everyone have a good Easter weekend? I know I did. On Good Friday I had some of the towns best fish and chips delivered to me by my sisters. It was raining and they stood in a very long queue for a very long time for which I am very grateful as the fish was delicious and still hot when it arrived(I offered to go with them but I live out of the way from where they were headed so they went without me).

On sunday we had a divine sunday dinner which my mother cooked, the lamb was the best it just melted in your mouth and the gravy had a little red wine in it. I got to see my nieces who I haven’t seen in a while the eldest who is 10 is now the same height as me, not that I am that tall to begin with 4 foot 9 inches to be precise.

The inspiration for this weeks card came about while I was flicking through the Spring/Summer catalog trying to decide what I should get next ( I just recently received my last order and I already want more stuff) and I came across a card on page 32. I looked at and thought I could make that, so thats what I did.

Here is the original.

Make your own custom greetings and embellishments with the new Simply Pressed Alphanumeric Mold.  Add color to your clay for endless possibilities.

And here is mine.

SAMSUNG CSC

To create the card I started with half a sheet of A4 whisper white and folded that in half. I then layered a diagonal lined mask over the card and sponged coastal cabana ink on the lines so it filled 3/4 of the card. Using the same ink I then stamped some stars from the perpetual birthday calendar over the lines. Next I cut 2 strips of card, coastal cabana and crushed curry to the width of the card and layered them so only a little of the crushed curry showed.

For the sentiment I inked it costal cabana and stamped onto the layered card stock of the same colour. To finish the card off I punched out some crushed curry stars using the star punch from the itty bitty punch pack and stuck them on using dimensionals.Finally I tied some white baker’s twine in the middle of the two different coloured card below the sentiment.

I really enjoy trying to recreate some of the projects displayed in the catalog. I find it a challenge trying to figure out what products they have used and how they have used them. I also try to make them my own especially if I don’t have all the required materials like the clay letters they have used on the original version of this card.

Thanks for stopping by come back soon.

Birthday Card Tuesday

Today marks the last day of this years Sale a Bration and what a sale it has been.

They had so many good products up for grabs I kind of wish some of them will reappear in the new annual catalog till then however I won’t be using any of the products in blog post after today as I don’t think it is fair to you my readers or customers if they can’t get hold of the products anymore.

On a good note the new annual catalog will be released on 2nd of June this year so that something to look forward to and you can bet I will do a little sneak peek in the week leading up to it.

So as a nice send off to Sale a Bration I thought I would use some of the products for this weeks birthday card and here it its.

SAMSUNG CSC

The base is crushed curry I thought it made sense to use one of the colours highlighted at the start of sale a bration with the beautiful buttons and ribbons. Its half a sheet of A4 like most of my cards and it has been layered with a piece of whisper white thats has had a piece of sheer perfection vellum stuck to it. The vellum butterflies I coloured using crushed curry, calypso coral, coastal cabana, strawberry slush, pistachio pudding and baked brown sugar stampin write markers. I really love the effect this has created.

For the sentiment section I cut a piece of crushed curry to a little wider than 2″ so that the 2″ circle would fit on it with a little bit of yellow showing. I then punched one end of the curry card with the scalloped tag topper I then threaded some white twine through the hole and wrapped it around the inside of the card a few time. After that I stuck the circle over the top of the tag opening and then stuck the tag down on to the card in the desired place. To finish of the card I used the happy birthday sentiment from big day stamp set and mounted it using dimensionals.

Thanks for stopping by and I hope you had as much fun as I did during this years sale a bration.